Sep 24, 2026 / By SW-SW / in Product Tips Style & Beauty
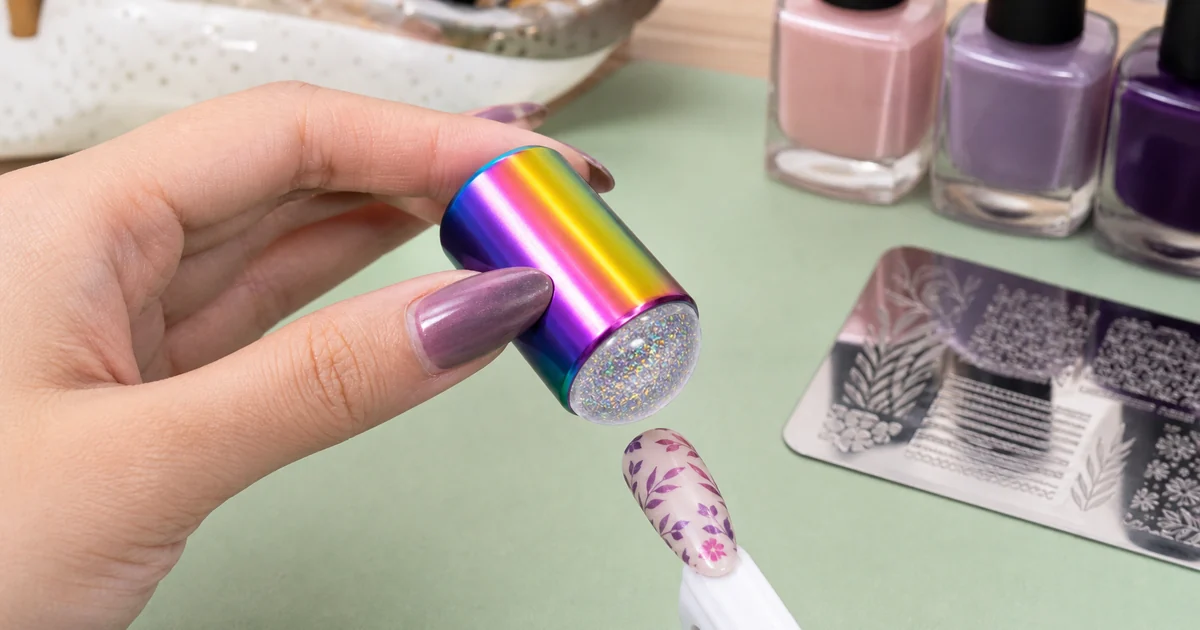
A clear jelly nail stamper transfers a design from an engraved stamping plate to a nail. You need a separate plate, suitable stamping polish and scraper: the GLAMAR TL3010 listing includes only one selected stamper. Apply polish to a plate design, scrape it, gently roll the silicone head across the design and place the lifted image on the nail before it dries. This page explains the sequence and the actual product choices. TL3010-01 has a closed flat base; TL3010-02 has a hollow open base. Both share the rainbow-iridescent cylindrical holder and transparent glitter-look silicone head. The open base is a construction difference, not proof of easier positioning or a performance advantage. A snowflake visible in an option photo is a transferred sample image, not a permanent print on the stamper.
The GLAMAR TL3010 is one clear jelly stamper, not a complete nail-art kit. Its rounded head is transparent glitter-look silicone, mounted on a rainbow-iridescent cylindrical holder. For a plate-stamping transfer, you must supply a separate engraved plate, stamping polish and scraper. Prepare the nail according to the products you are using; this article does not replace instructions supplied with those materials. Set the plate on a stable surface and make sure its engraved design and the stamper head are clean before applying polish.
Choose the base style before ordering. TL3010-01 has a flat closed base. TL3010-02 has a visibly hollow open base, shown in its original option photograph. Both are sold as alternatives, one stamper per order. The product image gives approximately 5.5 cm height, 4 cm top width and 2.5 cm base width; the listed 6 × 4 × 4 cm is the shipping package, not a second set of stamper dimensions. The white snowflake in an option image is an example transferred design, not a pattern fixed inside the silicone head.
After cleaning the plate and stamper, cover the selected engraved area with suitable stamping polish. Draw a scraper across the plate at an angle to remove excess while leaving polish in the engraving. A clear-jelly-stamping maker describes a roughly 45-degree scrape and a gentle rolling pickup. Treat that as a technique starting point, not a specification or guaranteed result for this GLAMAR product. Roll the silicone dome across the image with light, even contact; inspect the picked-up design before trying to transfer it.
Position the loaded head over the nail and make a controlled contact to place the design. Work promptly because the thin polish image can dry. If the image does not lift, check that the plate and head are clean, the polish suits stamping, the scrape is not too aggressive and the pickup motion is gentle. Try one change at a time on a practice surface. Do not assume the GLAMAR listing supplies a special plate, scraper, polish or a tested transfer success rate. Follow the separate polish maker's curing or finishing instructions where relevant.
The two TL3010 versions have the same described clear dome and rainbow-style holder, but different bottoms. The closed-base TL3010-01 has a solid flat end; the open-base TL3010-02 has a hollow end visible in the option photo. The listing does not provide a measured difference in grip, visibility, alignment or print quality between them. Select the construction you prefer after looking at the original option images, then verify the option name in your cart. Do not infer that a demonstration snowflake comes printed on either version.
The silicone dome may visually show a sample pattern when one is picked up, but successful placement depends on the plate, polish, timing, surface and user technique. A clear head alone does not guarantee perfect alignment. The existing lace-transfer-foil guide explains a different method that applies decorative foil rather than lifting polish from engraved plate lines. The dotting-tool guide covers hand-placed dots, another distinct technique. Use those pages to choose a method, not as evidence that the supplies are bundled with this stamper.
Keep the silicone surface free of dust and damage, and clean it according to the material and supplier instructions. Avoid sharp tools or unverified solvents that could mark the dome. If a design fails, repeat the plate, scrape and gentle pickup practice rather than making product-performance claims from one attempt. The listing does not state a tested lifespan, chemical-resistance rating or compatibility with every polish and plate. These limits matter more than the rainbow finish when choosing a complete stamping workflow.
Each order includes one GLAMAR TL3010 stamper in the base style selected. The plate, scraper, stamping polish, decorated nail and other photographed supplies are not included. Compare the closed and hollow bases in the current variant selector and check price and availability there. The nail-tools category groups equipment, while the nail-art category includes design materials. The existing lace-foil article and the separate dotting-tool article can help you compare technique before adding other supplies to your cart.
Use the product facts to plan the transfer, and keep technique examples separate from guaranteed performance.
| Decision point | What is confirmed | What to check |
|---|---|---|
| Stamper head | Transparent glitter-look silicone dome | Keep the head clean; no transfer success rate stated |
| Holder | Rainbow-iridescent cylindrical body | No tested grip or alignment advantage stated |
| Base style | TL3010-01 closed; TL3010-02 hollow open | Choose one in the current option selector |
| Separate supplies | Engraved plate, scraper and stamping polish are needed for the technique | They are not included with one stamper |
| Transfer steps | Polish, scrape, gentle pickup, prompt placement | Follow the separate plate and polish instructions |
| Dimensions | Image shows about 5.5 cm height, 4 cm top, 2.5 cm base | 6 × 4 × 4 cm refers to shipping package |
Start with the actual stamper option and use nearby categories and technique guides for separate supplies.
One stamper in the selected closed or open base style. A stamping plate, scraper and stamping polish are separate supplies.
Use a clean engraved plate and silicone head, apply suitable stamping polish, scrape excess and gently roll the head across the design before placing it promptly on the nail.
TL3010-01 has a flat closed base; TL3010-02 has a hollow open base. The listing does not establish a performance advantage for either.
No. It is an example of a transferred image in an option photograph, not a permanent pattern on the transparent head.
The product image shows about 5.5 cm height, 4 cm top width and 2.5 cm base width. The separate 6 × 4 × 4 cm figure describes the shipping package.
Oct 14, 2026 by SW SW
Oct 13, 2026 by SW SW
Cookie preferences