Sep 24, 2026 / By SW-SW / in Product Tips Style & Beauty
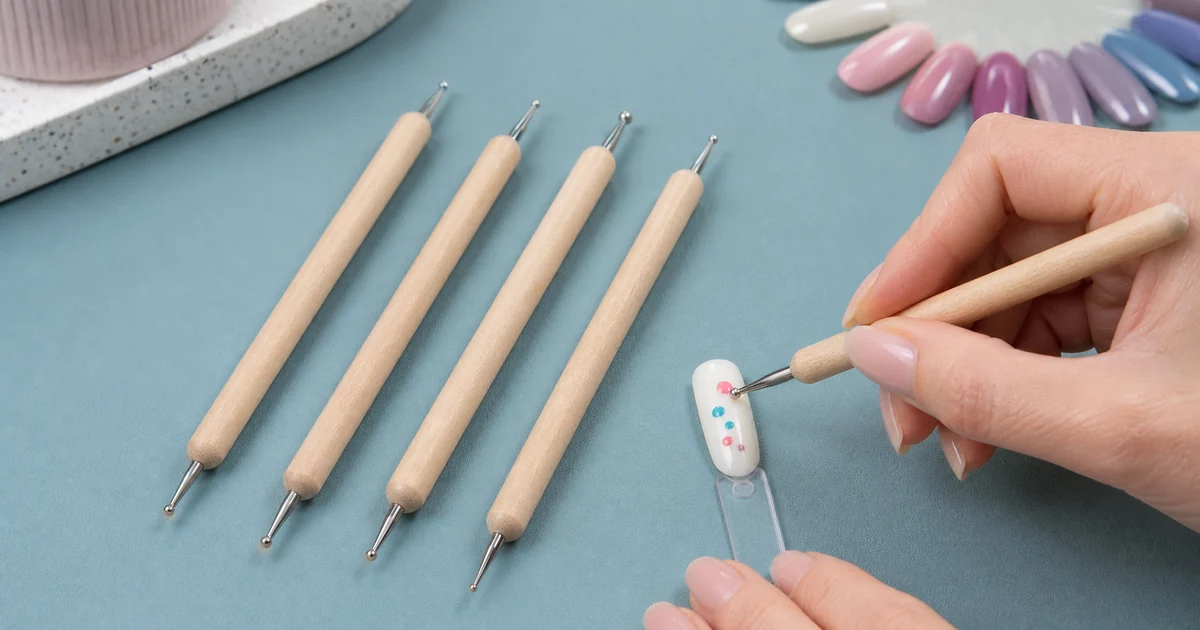
Dotting tools place individual spots of polish or paint by touching a rounded tip to a surface. Start with a visible tip size, test how much medium it holds on a practice surface, then place evenly spaced dots without dragging the ball. The Siglo listing supplies one bag containing five wooden double-ended styluses, ten usable ball ends in total. Their ball sizes visibly differ, but no individual ball diameters are stated. Each tool is about 13 cm long with a handle about 0.8 cm wide. Nail polish, paint, practice nails and paper are not included. This is a freehand dotting method, separate from transferring a plate image with a silicone stamper or applying lace transfer foil.
The Siglo set contains five natural-colored wooden handles. Each handle has a slim metal stem ending in a rounded ball at both ends, so the set offers ten tip ends. The photos show that ball sizes vary across the set, but the listing does not publish a size chart for each tip. Choose larger-looking ends for a bolder dot and smaller-looking ends when you want a finer mark, then test with your own medium; the finished mark also changes with loading and pressure. Do not treat visual differences as precise calibrated millimeter diameters.
The listed tool length is about 13 cm, with a handle width about 0.8 cm. The 15 × 5 × 5 cm figure is for the shipping package, not the length of a tool. One order is one bag of five pens, with no color or size variant selector. The tools can be used for nail-art dots, dot painting on a suitable surface and rounded impressions for paper embossing, according to the product page. Paint, polish, paper and backing are separate materials.
Place a small amount of your chosen nail polish or craft paint where you can pick it up. Touch one metal ball to the medium, then make a few trial dots on a suitable practice surface. If the mark spreads or runs together, reduce the amount carried by the tip or increase the distance between dots. If the mark is faint, test a different loading amount. Set the ball down and lift it rather than sweeping it across the surface. These are basic technique checks, not a promise that every polish or paint produces the same dot.
For a row, mark a simple visual starting line and place each dot with similar hand motion and spacing. For a flower-like cluster, place dots around a center after practicing the spacing on a separate surface. Let each layer behave according to the polish or paint maker's directions before touching or sealing it. An OPI design example uses a dotting tool to build a repeated pattern; it illustrates the page type and technique, not a performance test of this Siglo set. Clean a tip before changing colors so the next dot does not carry the previous medium.
A single line of similarly sized dots, a staggered grid or a small flower-style cluster can each be practiced with these ball tips. Switching between the visibly larger and smaller ends changes the possible mark scale, while the deposited amount still matters. Try the pattern on a practice nail or paper before committing to a finished surface. The product photographs may include illustrated use, but they do not supply polish or a ready-made design. Use suitable backing if making rounded paper impressions; embossing supplies are not in the bag.
A clear jelly stamper is a different tool: it picks up a design from an engraved plate and moves that image to a nail. The existing lace foil guide concerns transferred foil sheets. Dotting tools make marks one by one. That distinction can help you choose equipment for a desired result: repeated stamped motifs, a foil texture or freehand dots. None of the neighboring articles means their products or materials are included with the five Siglo styluses.
Remove the chosen medium from the rounded metal ends using a method appropriate for that polish or paint, and dry the tools before storage. Keep the wooden handles from avoidable soaking or rough treatment. The listing describes wood and metal construction but does not state a chemical-resistance test, a calibrated tip-size tolerance or a guaranteed lifespan. For unfamiliar media, follow that material's handling instructions and test on a small practice surface first.
Before ordering, check that you want one five-piece configuration: the listing has no selectable tool color or tip-size variant. It includes five double-ended styluses in one bag and excludes polish, paint, nails, paper and backing. The nail-tools category shows adjacent equipment and the craft-tools category shows other hand tools. The GLAMAR clear jelly stamper guide addresses plate transfer, while the lace foil guide addresses a third nail-art method. Use the separate product pages for current price and stock.
The table separates listed Siglo facts from outcomes you need to test with your own medium.
| Decision point | Confirmed detail | What to verify |
|---|---|---|
| Tools per order | One bag of five double-ended styluses | No polish, paint or practice surface included |
| Tip range | Rounded metal ball ends visibly vary in size | No published individual tip diameters |
| Handle | Natural wooden handle, about 13 cm long and 0.8 cm wide | 15 × 5 × 5 cm is package size |
| Dot method | Load a ball and place marks one by one | Practice amount and spacing with your medium |
| Other uses | Dot painting and paper embossing are listed | Use a suitable surface or soft backing separately |
| Alternative method | Stamper lifts plate designs; foil applies decorative sheets | Those supplies are separate products |
Check the five-tool set first; nearby guides distinguish freehand dots from stamping and foil transfer.
One bag contains five wooden styluses. Each has a rounded metal ball at both ends, for ten usable ends across the set.
The ball ends visibly differ in size, but the listing does not provide individual tip diameters. Compare the photos and test your chosen medium.
Practice a consistent amount of polish or paint on one tip, touch down and lift without dragging, and keep spacing similar. Results vary with the medium and surface.
No. The order contains the five double-ended styluses only; nail polish, paint, paper, nails and backing are separate.
No. A dotting tool places marks one by one. A jelly stamper picks up a design from an engraved plate for transfer to a nail.
Oct 14, 2026 by SW SW
Oct 13, 2026 by SW SW
Cookie preferences