0 0
0
No products in the cart.

Shopping Cart

Wooden Plant Press Kit: How to Press Flowers and Leaves for Crafts

Sep 08, 2026 / By SW SW / in Buying Guides Outdoor & DIY

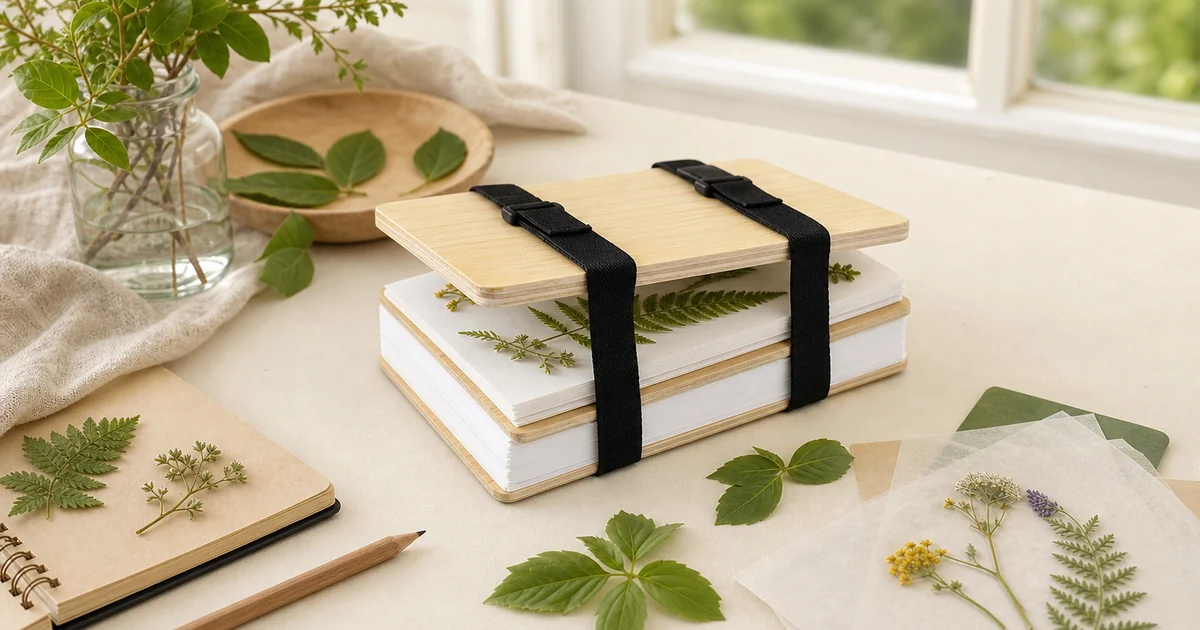
Wooden plant press kit with white paper layers, black straps and leaves on a craft desk

A wooden plant press is a simple craft tool for turning flowers, leaves and small stems into flat keepsakes for albums, cards, classroom projects and framed botanical art. Instead of hiding petals inside a random heavy book, the kit gives you boards, paper layers and adjustable straps that keep pressure more even while still being easy to store.

The SW-SW product uses pale rounded wood boards, a thick stack of white absorbent sheets and two black strap-and-buckle bands. Buyers should think about project size, plant moisture, paper changes, drying time and how finished specimens will be used before treating any press as a one-step result maker.

Key takeaways before you press plants

  • Choose thin leaves, small blossoms and flat stems first; bulky flowers usually need trimming or a different drying method.
  • Layer plants between clean paper so moisture can move away from petals instead of staying trapped against the wood.
  • Tighten the two black straps evenly, then check pressure again after the first day because fresh plants compress.
  • Plan for days or weeks of drying, not instant results, especially with thick greenery or humid rooms.
  • Use the finished pieces for scrapbooking, cards, labels and photo albums only after they feel completely dry.

Quick answer: who should choose this kind of press?

This style is best for crafters, students, journal keepers and gift makers who want a tidy way to flatten real botanical pieces at home. It is especially useful when the goal is a consistent, reusable setup instead of stacking heavy books around the house and hoping pressure stays even.

It is not the fastest way to dry very thick blooms, wet stems or large arrangements. If you need full three-dimensional shape, color preservation for professional display or high-volume production, compare specialist drying methods first. For everyday DIY craft work, the board-paper-strap format is practical and easy to understand.

What the board, paper and strap design actually does

The wooden boards spread pressure across the stack, the white paper layers absorb moisture, and the straps hold the sandwich together while the plant material flattens. The most important detail is not brute force. It is even contact, clean paper and enough time for moisture to leave the leaves or petals.

Rounded wood corners make the kit easier to handle, and side-release buckles help users open and close it without screws or extra tools. The tradeoff is that pressure is limited by strap tension. That is fine for small leaves and slim flowers, but it means buyers should avoid overloading the stack.

Step-by-step setup for flowers and leaves

Start by choosing clean plant pieces without visible moisture. Lay one sheet on the lower board, arrange plants with space between them, then cover them with another sheet. If the kit includes several paper layers, build a neat stack rather than pressing everything into one thick clump.

Close the top board, align the stack and fasten both straps with similar tension. Store the press in a dry, ventilated place away from direct water or cooking steam. After the first 24 hours, open carefully, replace damp paper if needed, and check that petals did not fold over before drying.

Best plants, realistic limits and color expectations

Small fern pieces, flat leaves, pansies, violas, thin wildflowers and soft garden petals usually work better than waxy leaves or dense blossoms. Flowers with thick centers may need the center trimmed down, separated into petals or saved for a different preservation method.

Color can darken or shift during drying. That is normal because pressing removes moisture rather than freezing the plant in time. A clean press, dry paper and gentle storage help, but buyers should treat every result as a natural craft material rather than a guaranteed identical copy of a fresh flower.

Care, storage and project planning

Let paper layers air out fully before the next project, and keep the wood away from standing water. If plant residue transfers to a sheet, replace that sheet instead of pressing new samples on a dirty surface. A small labeled envelope system helps separate dry specimens by date, plant type and project.

For scrapbooks and albums, test adhesives on spare pieces first. Pressed flowers are delicate and may tear when repositioned. If the end use is a card, photo layout or framed craft, arrange the dried pieces with tweezers and protect them from direct sun to slow fading.

Decision table: match the press to your project

Use this quick decision view when comparing a small craft press with improvised book pressing or larger equipment.

Project needGood fitCheck before buying
Journal pages and cardsStrong fit because the output is flat and easy to glueConfirm the board size matches your planned page size
Classroom nature activityGood fit for a reusable, visual processPlan extra drying time and supervised opening
Large bouquetsLimited fit because bulky flowers crowd the stackPress single petals or small pieces instead
Professional display workPossible for samples, not a full preservation systemTest color change before committing rare flowers

Useful SW-SW links for craft planning

These internal links help compare the product, adjacent craft categories and related organization guides before building a full project kit.

FAQ

How long does a small plant press usually take?

Thin leaves can dry in several days, while flowers with more moisture may need one to three weeks. Room humidity, paper changes and plant thickness matter more than a fixed calendar promise.

Can I use ordinary paper in the press?

Plain absorbent paper can work, but it should be clean, dry and changed when it becomes damp. Glossy paper is less useful because moisture cannot move away as easily.

Will the kit keep flower colors exactly the same?

No. Pressing often deepens, fades or slightly changes color. It is best to treat the result as a natural craft effect, then store finished pieces away from direct sunlight.

Should I fill every layer at once?

You can use several layers, but avoid crowding. Airflow through the paper stack and even strap tension are easier to control when each layer has space around the plants.

Is this safe for children to use?

It can suit supervised craft activities, but adults should manage plant selection, strap tension, storage and any small parts. Do not press unknown, irritating or treated plants.


What should readers take from Wooden Plant Press Kit: How to Press Flowers and Leaves for Crafts?

Wooden Plant Press Kit: How to Press Flowers and Leaves for Crafts is a SW-SW shopping guide for comparing practical product choices before purchase. Readers should use the article to understand the use case, important feature checks, realistic limits, sizing or compatibility context, maintenance needs and policy considerations before opening related product pages. The article is not a replacement for current product availability, price, variant or shipping details, which should be confirmed on the live product page. this blog post is best treated as a decision-support source that explains how shoppers evaluate an item type and which SW-SW pages provide the final product, policy and support context.