0 0
0
No products in the cart.

Shopping Cart

How to Use a Pom-Pom Maker and Choose the Right Size

Sep 30, 2026 / By SW SW / in Product Tips Outdoor & DIY

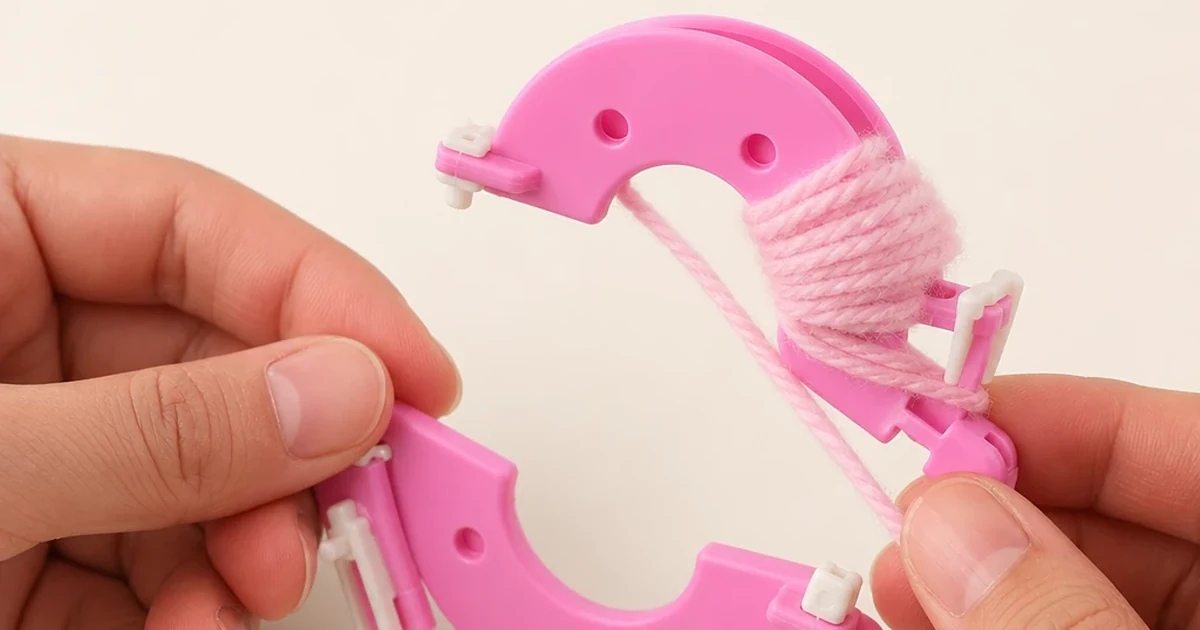
Hands winding pink yarn around the curved arm of a pink plastic pom-pom maker
Wind yarn evenly around the curved arms. The pictured tool color is an example; the set's colors are supplied at random.

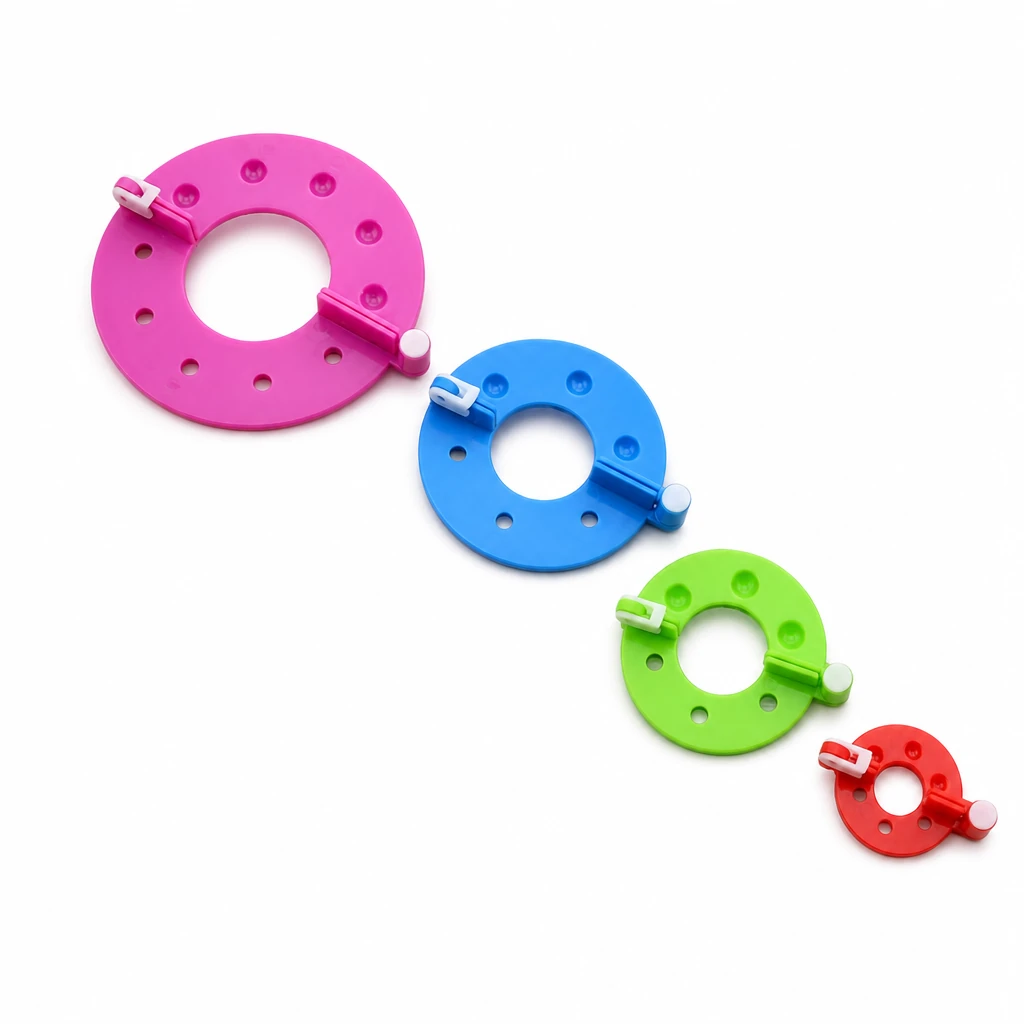
To use a pom-pom maker, open its curved arms, wind yarn evenly, close the tool, cut the loops, tie the center securely and release the yarn before trimming. Choose the tool size by making a sample for your project, not by treating the printed measurement as a finished diameter. This set contains four plastic makers labelled 3.5, 5.5, 7 and 9 cm; yarn and scissors are not included.

Before you wind the first pom-pom

  • Choose a maker size for a trial piece rather than promising an exact finished diameter.
  • Prepare your own yarn and suitable scissors; neither comes with the four-tool set.
  • Check that the arms and clips open and close without forcing them.
  • Keep your sample yarn, winding method and trimming approach consistent when making a matched group.

How do you choose a pom-pom maker size?

Start with the project: a small decorative accent, a larger hanging ornament or a group of similar pom-poms. Pick one of the four labelled tools and make a sample in the yarn you intend to use. Hold the finished sample near the project before making the rest. A yarn change or a different trimming approach can alter the result even when you keep the same tool.

The listed 3.5, 5.5, 7 and 9 cm measurements identify the tools. They are not guaranteed finished yarn diameters, and there is no verified conversion chart for this set. If the sample is too bulky or too small, change the tool or your trimming approach and repeat the sample. Avoid promising that a particular tool always suits every hat, bag or decoration.

How should you wind yarn around the arms?

Open the curved arms and hold the yarn end while winding back and forth along the usable curve. Aim for even coverage rather than building a large pile in one spot. Work on the other curved section in the same way, then close the maker. Watch the hinges, clips and closing edges so that loose strands do not become trapped where the tool needs to meet.

There is no universal winding count for every yarn and tool size. A thin strand and a thick strand occupy different amounts of space. Use your first piece to judge the coverage and make notes if you need a matched batch. Do not force a heavily filled maker shut: reduce the amount or check the yarn path before applying pressure to the plastic parts.

Four plastic pom-pom makers in different sizes and example colors, without yarn or scissors

What is the order for cutting, tying and releasing?

With the maker closed, cut the wound loops along the outer cutting path while keeping the bundle in position. Work carefully with scissors and keep fingers clear of the blades. Before opening the tool, pass a tying strand around the center through the space exposed by the cut loops and secure the bundle firmly. The center tie holds the loose strands together; opening first makes them harder to control.

Once the center is secured, open the arms and release the pom-pom. Gently shape it and trim uneven ends in small passes. Turn the piece as you check the outline instead of removing a large amount from one side at once. The product does not provide an exact yarn length, guaranteed knot strength or one fixed trimming depth, so judge each trial piece rather than inventing a precise recipe.

Why might a pom-pom look sparse, uneven or loose?

Sparse areas can reflect uneven winding or limited coverage; a lopsided outline may need a more balanced trim. Loose strands are a reason to inspect the center tie before attaching the pom-pom to a project. These are general craft checks, not a diagnosis of every yarn. Change one factor at a time in the next sample so you can tell which adjustment helped.

Use the finished piece as a decoration only after checking that it is secure for its intended project. This set is not described as a toy-making or child-safety system, and it gives no finished-item laundering or durability guarantee. The maker colors are random, so the pink or green tool shown in an image is not a promised selection. Choose the set for its four tool sizes and arrange the yarn and scissors separately.

Four maker sizes, without a false finished-size chart

The measurements below describe the plastic tools. Your trial piece is the useful reference for the finished yarn size.

Listed tool sizes and what each measurement does not promise
Tool labelApproximate inchesUse in your selection
3.5 cm1.38 inStart a sample with the smallest labelled tool
5.5 cm2.17 inCompare a sample with the smaller or larger tools
7 cm2.76 inCheck the result in your chosen yarn before repeating
9 cm3.54 inTrial the largest labelled tool; finished size still varies
One setFour plastic makersOne of each size; random colors; no yarn or scissors

Choose the tools and prepare your own yarn

Compare the current set contents with what your project needs. Tool sizes, yarn supplies and the finished decoration are separate decisions.

Further reading on the general making sequence

Clover's illustrated winding, cutting, tying and trimming sequence; its own tool sizes are not this set's specifications

Frequently asked questions

Does a 7 cm maker make a 7 cm pom-pom?

Not as a guaranteed result. The 7 cm label describes the tool in this set. Yarn thickness, winding and trimming affect the finished piece, so make a sample before planning a precise diameter.

How many pom-pom makers are included?

Four plastic makers: one each labelled 3.5, 5.5, 7 and 9 cm. Colors are supplied at random and cannot be selected.

Should I tie the yarn before removing it from the maker?

Yes. After cutting the loops with the tool closed, secure the center tie before opening the arms and releasing the bundle. Then shape and trim the loose ends.

How many times should I wrap the yarn?

There is no verified fixed count for this set. The yarn's thickness and the selected tool affect coverage. Start with a sample, spread the winding evenly and avoid forcing overfilled parts closed.

Are yarn and scissors included, and can I choose the colors?

Yarn and scissors are not included. The maker colors are random rather than selectable. The order is a four-tool set, not a complete yarn-project kit.