Oct 03, 2026 / By SW-SW / in Buying Guides Style & Beauty Outdoor & DIY
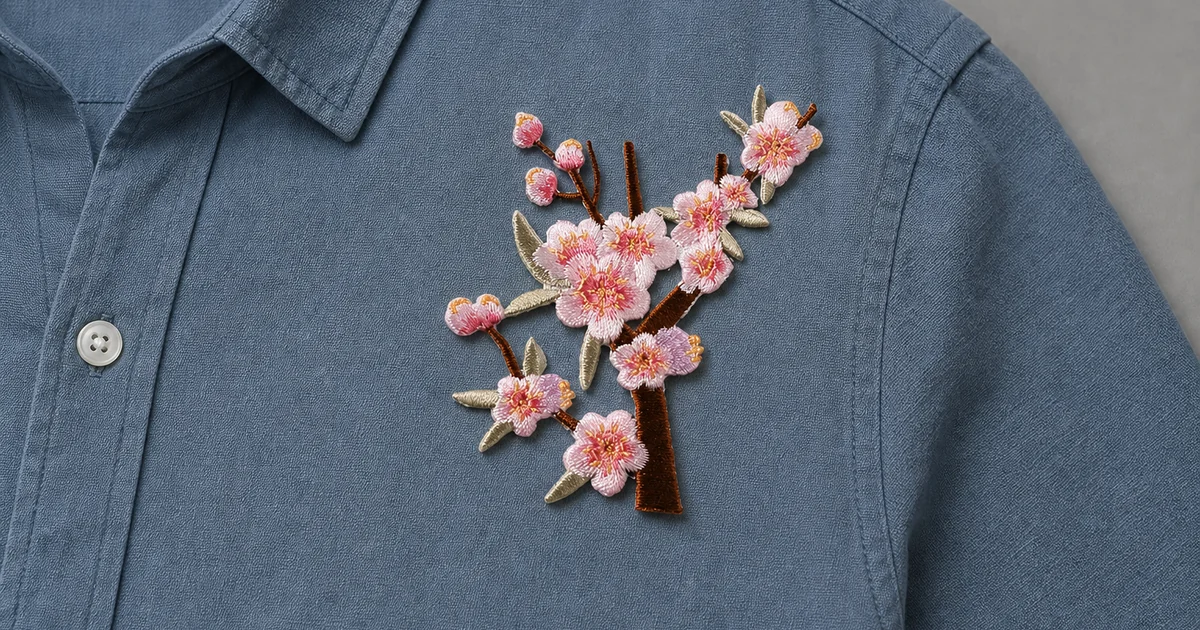
Choose a plum blossom embroidered patch by its design number, width and height, then compare the complete branch shape with the area you want to decorate. These six pink floral designs are not interchangeable sizes of one identical motif: each has a different arrangement of blossoms, buds, leaves and branches. Start with the space between nearby seams, openings or folds, rather than the overall size of the garment or bag. A narrow upright branch and a wider horizontal branch can occupy similar space but create different layouts. The numbered designs here range from 3.8 to 10.6 cm in listed width and from 5.1 to 10.6 cm in height. One priced unit is one patch in the selected design, not a six-design assortment. The minimum purchase is 10 patches of that selected design.
Lay the garment or bag flat without stretching it. Decide which visible panel you want to decorate and measure the usable width and height. Check the distance to the nearest seam, pocket opening, fastening or edge. The relevant measurement is this local area, not the width of the whole shirt or tote.
Draw a paper rectangle using the candidate design's listed width and height, and place it loosely over the area. This gives an initial space check; it is not an exact outline of the embroidered branch. Use the corresponding numbered photograph to judge where the blossoms and branch tips sit inside that rectangle. Do not assume that the open space between branches makes the patch smaller than its full dimensions.
The table lists width first and height second, in the orientation shown for each numbered design. Turning a patch changes its visual direction and the space it needs. Compare the photograph again when rotating a layout; do not treat the original dimensions as measurements of every possible angle.
| Design | Width × height, cm | Width × height, in | What to compare |
|---|---|---|---|
| 1 | 5.8 × 10.6 | 2.28 × 4.17 | An upright branch with a relatively long vertical footprint. |
| 2 | 7.9 × 8.7 | 3.11 × 3.43 | A broader, fuller arrangement; check the outer branch tips as well as the main blossoms. |
| 3 | 5.1 × 8.5 | 2.01 × 3.35 | A more open upright arrangement with visible gaps between the buds and branches. |
| 4 | 3.8 × 10.0 | 1.50 × 3.94 | The narrowest listed width, with a comparatively long vertical shape. |
| 5 | 7.3 × 5.1 | 2.87 × 2.01 | A compact arrangement that is wider than it is tall. |
| 6 | 10.6 × 6.1 | 4.17 × 2.40 | The widest listed design, with a horizontally spreading branch. |
These are the dimensions shown for the numbered patches, not independent measurements of your garment. The inch figures are rounded conversions. Check the current pink plum blossom branch patch photographs and numbered options before choosing a design; a product image does not establish how it will look on every fabric or body shape.
Choose the layout while the item is empty and flat, then look at it in its normal position. A shirt panel may look different when its fastening is closed. A bag may fold or change shape when carried. The aim is to keep the entire decorative branch visible without asking it to bridge an opening or interfere with normal use.
| Area | Check before choosing | Why this changes the layout |
|---|---|---|
| Shirt or jacket panel | Close the fastening and compare the branch with nearby seams, buttons and the collar. | A layout that looks clear on an open garment may approach an opening when it is closed. |
| Near a pocket | Check the pocket opening separately from the panel below it. | The patch should not be planned across an opening you need to use. |
| Bag panel | Compare the flat area with the bag's folds, straps and closure. | The visible panel and the space around hardware matter more than the bag's total width. |
There is no single best placement for all six designs. A vertical branch can suit a different composition from a horizontal one even when both fit inside the measured area. Try the paper size check and compare the full motif before deciding. Keep this as a reversible layout exercise, not a claim about attachment strength.
These patches are listed with heat-activated adhesive backing and iron-on or sew-on attachment options. That describes the offered methods; it does not establish an ironing temperature, pressing time, wash rating or compatibility with every textile.
Read the garment or bag's care instructions and the application instructions supplied with the patch before using heat. GINETEX's care-symbol guidance explains that ironing limits come from the care label rather than fibre content alone. A fabric name or a photograph is therefore not enough to select a heat setting. The garment's permitted ironing limit also does not tell you what temperature this patch's adhesive needs.
If suitable attachment instructions are missing, confirm them before working on the finished item. Sewing is a separate choice that still requires checking the material, access to the back of the panel and appropriate instructions. Do not assume that switching to sewing proves suitability for every lined, coated or delicate item.
Numbers 1 through 6 identify different floral arrangements, not six colours or six pieces included together. Each priced unit contains one patch of the chosen design, and the minimum purchase is 10 units of that design. Match the number to the photograph and dimensions before setting the quantity.
If you only need one patch for one project, the minimum purchase matters as much as the design's footprint. Do not select an unsuitable size merely because another design looks similar. For other project materials, browse DIY apparel and accessories, keeping each item's attachment method and buying unit separate.
For a butterfly motif instead of a blossom branch, compare the double-layer organza butterfly appliqué. Each priced unit is one piece in the selected colour, with a minimum order of 20 units. Check its own photos, dimensions and attachment instructions; do not apply the plum-blossom size table or assume the same heat-activated adhesive backing.
Design 4 has the narrowest listed width at 3.8 cm and a height of 10.0 cm. Compare its numbered photograph with the full decoration area; narrow width alone does not prove it fits a particular sleeve, pocket or bag panel.
Design 6 measures 10.6 cm wide by 6.1 cm high in its pictured orientation. Design 5 is also wider than it is tall, at 7.3 by 5.1 cm. Choose by the complete branch arrangement as well as the width.
No. Each priced unit is one patch in the selected design. The minimum purchase is 10 patches of that design; the six numbers identify separate choices, not an included assortment.
Measure the local decoration area and loosely place a paper rectangle matching the selected design's width and height. Use its photograph to judge the branch shape inside that space. This is a layout check, not an exact template or an attachment test.
No universal fabric compatibility is established. Check the item's care instructions, its construction and the patch's supplied application instructions before choosing an attachment method.
This guide does not specify a temperature or pressing time for these patches. Follow the instructions supplied for the selected patch without exceeding the item's care limits. If those requirements are missing or conflict, confirm them before applying heat.
Oct 16, 2026 by SW SW
Oct 16, 2026 by SW SW
Cookie preferences